
This section will be a bit of a grey area, as it really is a lot of trial and error to make sure everything is correct.
Before range testing, you'll need to make sure you have a proper 434MHz Yagi-style antenna, either homemade or commercially built. In our experience, using a homemade antenna has wielded much less than acceptable results, so it is highly recommended that you either do some major research into this area or just spend the extra dollar and purchase an antenna. If you do go the route of building one, here are a few tips that may help you along the way:
- Use antenna rods with very high surface area. This can either be accomplished by using thick rods of metal or by using large rods with hollow centers. The radio waves being broadcast only need to touch the surface of the metal to be received, so either method will work. Keep in mind that thicker metal will also make it heavier and harder to transport, but also much more stable.
- The base can be constructed out of any material of any size. In our case, we used a simple plank of wood.
- The QuickYagi software, although extremely archaic, is extremely useful for finding the measurements required to construct the antenna properly. You also will need to know the structure of a Yagi antenna before being able to use the measurements. The diagram below may be of help when reading the program's output.
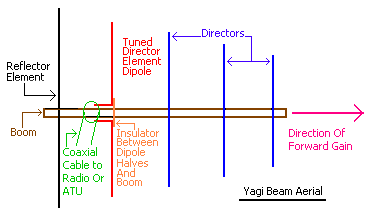
Fig. 1: Yagi antenna structure diagram. ( Source)
Once you have your antenna, you will need to attach its output to the input of the 434MHz HABamp filter and preamp. This device isolates frequencies around the 434MHz range and amplifies them, making them easier to read from larger distances. To make sure it recieves power from the correct source, detach the screws from the bottom of the device and remove the top cover. On the circuit board, you should notice a small switch labeled "HEADER" and "BIAS-T". In order for the device to correctly recieve power over USB, turn the switch to "BIAS-T" and reattach the cover.
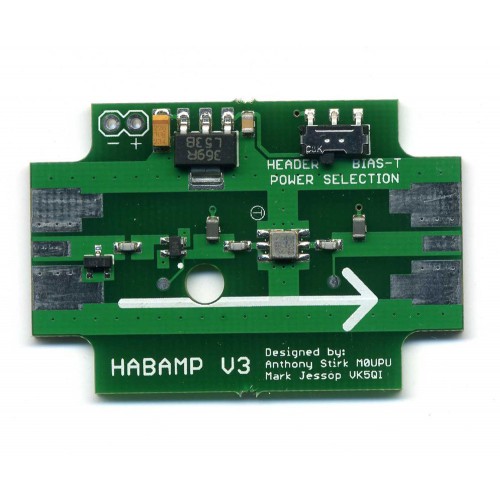
Fig. 2: Photograph of the HABamp 434MHz's circuit board.
After this, attach the output of the HABamp to the FUNcube dongle, and you should be nearly ready to start range testing. However, there is one more program required to get things working properly. Remember how we were just discussing Bias-T? The FUNcube dongle requires this feature to be enabled on its end as well. Download the following configuration tool from FUNcube's website:
http://www.funcubedongle.com/MyImages/FCHid2.002.zip
Extract the archive and run the executable found inside. Once launched, there should be a small checkbox in the top-right corner of the program labeled "Bias-T". Make sure it is checked, and you can now safely exit the program. This will need to be done each time the computer starts up and each time the dongle is plugged in, so keep this in mind.
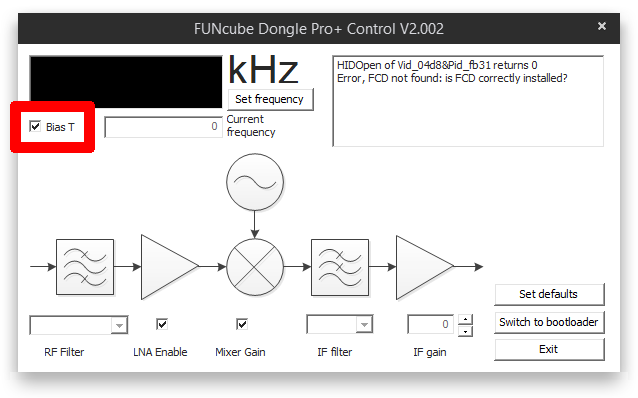
Fig. 3: Screenshot of the FUNcube configuration tool, illustrating the location of the "Bias-T" checkbox.
Now comes the trial and error. Follow the steps described in previous pages to start the Pi, get SDR# and Dl-fldigi set up, and you should begin receiving data like before. Place the payload in or near an outside location, preferably high up somewhere, like a second story window. Bring the receiving laptop and antenna in a car and begin driving away from the payload. The farther distance you can get while still receiving data legibly, the better. In the final flight, you will be about 22mi (~35km) from the payload when it reaches its highest point, so this will be the goal you should aim for. However, one of the disadvantages of testing on the ground is that there will be a great amount of interference due to trees, houses, and other obstructions. The distance you will be able to obtain will be less than what you will get in a real flight, but do not overestimate this difference. If you are able to obtain around 20mi (~32km) or more, you will definitely be well in the clear. Once you are sure everything is working correctly, it's time to move onto a test flight.
Pi Software << >> SDR#
